 [Click the pic, use your mouse to look around]
Above: the night sky as seen from our driveway. It was because of this view that I acquired my first telescope and joined the Saint John Astronomy Club to find out more. Taken between Norton and Cassidy Lake, New Brunswick in November 2017.
Overview~

Making 360° panoramas of the night sky is relatively easy, but it does require some specialized equipment and software. It does not require a huge investment, especially if you already own a DSLR, have a computer, and have some working knowledge of photo processing programs such as Photoshop, Lightroom, etc.
However, before approaching the concept of making 360 panos, two terms must be acknowledged because they affect the why of everything: What is Parallax and What is the Entrance Pupil of a Lens?
Parallax and Entrance Pupils~
 [click any pic to enlarge]
Without getting too long into definitions that you can Google yourself, Parallax is a point of view shift seen by lenses and our own eyes. You can see it for yourself by holding your finger or thumb out in front of you, shutting one eye and then the other and watching something in the distance “flip” back and forth. And that’s with your eyes relatively close together in your head! Even if you stand in a large room, looking across the room past a cross pane in a window, you can make an object half a mile away flip on either side of the cross pane.
This “parallax effect” can play havoc when trying to stitch together photographs. If you’ve ever used Photoshop>File>Automate>Photomerge, you may have had some hit or miss results. Perhaps you’ve been at a wedding and wanted to photograph the head table but couldn’t get back far enough, or been at a scenic lookout too vast to take with any lens, so you take a series of pictures in a row and try to “stitch” them later, only to find that weird results sometimes happen.
Part of the reason for the problem in stitching is that the lens on your camera is moving across an arc as you are taking pictures. Lenses, like our eyes, have pupils where the light is gathered. This is called the Entrance Pupil of a lens. Just like our eyes with the pupil and iris, it is set back in a bit. The Entrance Pupil of a lens is where the camera actually “takes” the picture. So if you can make an image “flip” back and forth with your own eyes close together, imagine what is happening inside a camera as it moves in an arc.
If only there was a way to keep the Entrance Pupil of the lens in the same spot as you move your camera. Well, there is. It’s called a 360 pano head.
Pano Heads, Equipment & Software for 360 Panos~
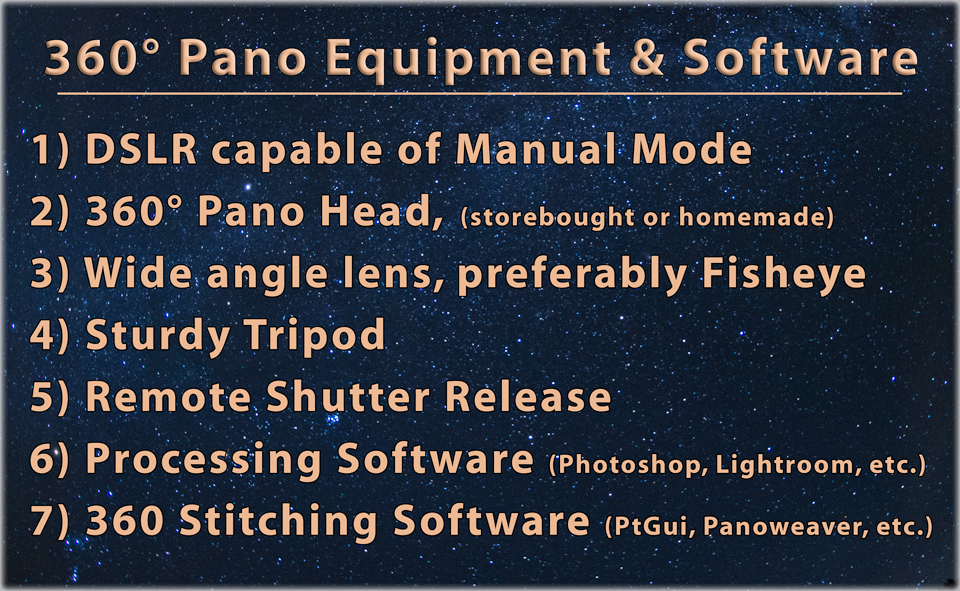
1) A DSLR capable of Manual Mode~
Why manual mode? Because you are effectively creating one spherical photograph, one you can stand inside, which is made up of “panels” of the images you take. All exposures must be the same. Manual shutter speed and aperture, manually set ISO and White Balance. Any auto settings have to be disabled. That means Auto White Balance and Auto ISO have to be switched to Off.
2) A 360° Panoramic Head, either store bought or homemade~
 [click to enlarge]
There has been an explosion of pano heads, related equipment and software since I first delved into this about five years ago. At the time, I was only interested in doing daytime panos and it never even occurred to me to try night sky imaging. If you do go looking for pano heads my only suggestion is:
~Get one with click stops (most of them do now–handy in total darkness)
~Make sure whatever model you choose can support the weight of your camera and lens.
~Make sure that it allows for taking the Zenith overhead shot. Gotta get that Milky Way! Some pano heads are for “single row” panos as in real estate tours, etc., for taking 120°, 180°.
~Do check out the link Panoramic Photo Guide/Purchasing Advice or similar pages.
3) A wide angle lens, preferably a fisheye~
Why fisheye? Because the less shots you can take the better, and fisheye lenses lend themselves to spherical photography. In theory you could use any lens, but since the images must overlap a minimum of 20%, that could mean a lot of images taken in a straight 0° row, at 30 or 45° up, 30 or 45° down, plus the Zenith and Nadir (down) shots.
4) A sturdy tripod, the best you can acquire~
A ball head is helpful for leveling.
5) A remote shutter release for long exposures~
6) Processing software such as Photoshop, Lightroom, Gimp, etc.~
Whatever your favourite, the important thing is that all processing must be the same. Shoot RAW if you are comfortable with it, process in Lightroom or Adobe Camera Raw, save your settings and apply that setting to all images. If you shoot jpeg and adjust Levels to bring out the Milky Way, those exact same settings must be applied to all the other images. Creating presets and using them saves time and ensures accuracy. Manual exposures, identical image processing is key.
7) 360 stitching software~
PtGui, Autopano, Panoweaver, Pano2VR, shareware Huggin, etc.
 [click to enlarge]
Stitching software is designed to find commonalities, or control points, between images that allow it to “stitch” the photos together. In the PtGui Control Points window of the daytime pano shown above, the software found 57 control points automatically between images 3 and 4. In the nighttime pano shown below, it found only 15 because of darkness. 
 The photo above shows the Preview Exposure slider which we can use to “see” more possibilities if we need to find more control points in a dark sky image. In PtGui, the Preview Exposure slider is your friend, especially when trying to complete the stitch with the overhead Zenith shot. You need at least 4 common control points between images for a successful stitch in PtGui. Preview does not affect the appearance of the actual image.
Note: it may not be possible to find 4 control points between the Zenith image and all of the horizontal shots, but 2 images out of 6 will generally work for a successful stitch.
Some examples are shown below. Click the pic, use your mouse.
A Visit to a Star Party~

Livingston Lake, New Brunswick~

National Star Party at Irving Nature Park~
 This was at the National Star Party event at Irving Nature Park in Saint John, NB, in July of 2017. Most of the crowd had left by this point. It was a beautiful evening.
Astronomy by the Bay~
 A typical June evening at Saints Rest Beach in Saint John with fellow astronomers and members of the public with Astronomy by the Bay.
What I Use~
Currently I am using an old Nikon 610 full frame camera, a used Sigma 8mm fisheye lens, and a Meng Photo 360 Pano Head. With this setup I need 4 shots all way around @ 90° plus a Zenith shot, the Nadir shot I usually don’t bother with at night.
I started out with a Nikon d5100 DSLR, a used 10.5mm Nikon Fisheye, and an old Panosaurus 360 head I bought for $99 USD–now discontinued. With that setup you need 6 shots all way around @ 60° plus a Zenith shot. Almost all my night time panos turned out ok. All the pano examples you see above were taken with the d5100 and a 10.5 fisheye.
Why did I go from the d5100/10.5 fisheye to the 610/8mm Sigma? For one thing, you need less shots with the 8mm fisheye and using full frame gives you some pixel advantages.
Also, I was having some stitching problems with the 10.5 when doing daytime panos, especially if set up on a boardwalk with many geometric patterns to align. It simply takes less processing time on the computer.
I shoot RAW and process in Adobe Camera Raw or Lightroom using presets, save as a TIFF, tweak images if needed in Photoshop (must be identical for all images), then stitch in PtGui. PtGui is a learning curve but very intuitive, and one of the best pieces of software I’ve ever used.
You can also skip tweaking the individual images in Photoshop (which is safer), and instead tweak the final stitched image which PtGui saves as a jpeg.
For daytime panos, the best quality I’ve encountered is taking bracketed exposures of about 1/2 stop and then merging them in Adobe Camera Raw or Lightroom. With the PtGui Pro Version, it will accept bracketed exposures, but then you have triple the number of images to stitch.
For what its worth, the first night sky pano I attempted was in my backyard shooting jpeg ISO 640 @ 30 sec and everything turned out fine. I now shoot RAW 1600 ISO @ 30 sec to try to get that extra something out of the incredible night sky we have here in New Brunswick.
Sharing~
Facebook is incredibly easy to share your panos, as it recognizes it as such, and usually loads beautifully taking less time than to make a cup of coffee.
To upload and use a pano on a website is considerably more complicated. After the pano is successful and created, you have to create a folder on your desktop, export the finished pano jpg for web, save some 19 files in that folder, and then upload that folder to the website using ftp or the c-panel on your website. The website only uses one of those files, but has to be able to call up the other 18 files in order for it to work. There may be a shortcut, just haven’t discovered it yet. I tried a couple of WordPress plugins, but so far this is the most reliable process.
There are many Facebook groups, webpages and formats where people share their work from all over the world, including Google Earth. Some are astounding and inspiring, as they “put you there.”
360° Panoramic Heads~
Nodal Ninja
iOptron iPano Robotic Head [mainly for gigipan photography]
Manfrotto Pano Heads
Easy Pano Pano Heads
Mengs Photo Panoramic Head [China, sold by Gumptrade or ebay]
FLMCanada Pano Heads [links to purchasing not all working?]
Acratech Pano Heads [collar for a Sigma 8mm fisheye only]
Panocatcher Robotic Panorama Heads[European]
Cambo Panoramic Heads [European}
Novoflex Pano Heads [European]
Really Right Stuff [wide range of photo & pano accessories]
Seitz Roundshot [handy if you have $12,000 laying around]
Wiki Panohead Database
Note: The quality of some of the European panos is astounding, so even if you don’t want to order from there, it is interesting to check out some of the equipment (and see if they are being offered here).
This is a very fluid market right now. Websites and distributors are changing constantly, and although I check the links from time to time, links may expire overnight.
[links checked October, 2023]
General Information~
IVRPA Resources [wealth of information!]
Canadian Nature Photographer/Spherical Photography
Rosauro Photography [lots of info on this Canadian website]
360° Stitching Software~
PtGui
Panoweaver by Easypano
Hugin from sourceforge.net freeware/shareware
Good tutorials~
PtGui Video Tutorials
Pano-guru Tutorials
Pano Guru Youtube Link
Panoweaver Tutorials
John Houghton Panos Tutorial, etc. [wealth of information]
360cities-How to get started
Wiki Panotools/tutorials [source of good general information]
Entrance Pupil Database of Various Lenses~
Wiki Panotools/Entrance Pupil Database
How Many Shots do I Need with Various Lenses~
Wiki Panotools/number of pics for a 360
Finding the No Parallax Point (NPP) of a Lens~
John Houghton Panos/find the NPP
Pano Guru Finding the NPP (Youtube)
Rosaurophotography Finding the No Parallax Point–Grid Method
More Resources~
IVRPA International Virtual Realty Photography Association
Wiki Pano Photographs & Resources
360° Panoramic Photographers on Facebook
About this Page~
This page is just a collection of bookmarks and other information I’ve turned up over the years. Maybe it will save you some digging.
I would like to thank Paul Owen for his guidance on photographing the night sky.
Questions? You can contact me via email.
Cheers,
Jim Stewart
New Brunswick, Canada